-
In 2005 I started knitting around Halloween.
I made 9 scarfs for Christmas and taught Julie to knit.
2006 Finished:
4 baby blankets
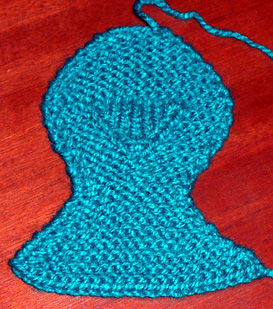
2 stocking hats
2 drawstring knitting bags (one small, one medium)
1 knitted belt (that should have been a tie)
too numerous to count : dish cloths
1 cell phone bag
1 soap bag
5 shrugs
1 Barbie shawl
Started but not finished:
Pat's tie
Pat's vest
Blue socks
Tuesday, December 26, 2006
What did I make in 2006?
This was my first full year of non-stop knitting. What did I make? Hm... it seems there must have been more than this. I guess packing and moving took more of my knitting time than I realized. I also taught Jen, Lala, Becky, and Kelly to knit and taught JJ and Kayleigh, Lala and Reyes spool knitting on the Knifty Knitter looms.
Friday, December 8, 2006
Socks, Socks, and more Socks for 2007!
 He has the room stuffed with computers and other temporary items. He had to bring home a lot of the things from his dorm room because the staff was going to polish floors over the holiday. The spare room isn't very big to start with. We have the last of the unpacked boxes in there, my sewing materials, Joe and his dorm overflow. Trust me -- it's a case of "Go outside to change your mnd." Ah, well. Guess I'll just have to start a new project.  Johanna has challenged the KansasKnitters to join her in knitting a pair of socks a month during 2007. I've never made socks before, so my goal will be 6 pairs in 2007. I started my first pair using Lion Brand Magic Stripe yarn in blue. Here's the pattern. I hope they will look like the picture on the yarn band. Here's the website for this pattern: http://cache.lionbrand.com/patterns/kmstripe-socks.html?noImages=0 Magic Stripe Basic SocksLion Brand® Magic Stripes GAUGE: 28 sts + 40 rows = 4 inches (10 cm) in St st (k every stitch in the round; k on RS, p on WS when knitting flat). BE SURE TO CHECK YOUR GAUGE.STITCH EXPLANATION:
| |||||||||||||||
SOCKS Cuff Loosely cast on 56 sts. Divide sts evenly onto 4 double pointed needles. Place marker and join, being careful not to twist sts. Work in K1, P1 Rib for 1 inches. Work in St st until piece measures 6" from cast on edge. Place last 28 sts on a holder (instep sts). Heel flap (worked back and forth on 28 heel sts only) Row 1 *Slip 1, k 1; rep from *. Row 2 *Slip 1, p 1; rep from *. Repeat Rows 1 and 2 until heel flap measures 2¼" (28 rows), ending with Row 2. Turn Heel Row 1 K 17, ssk, k 1, turn. Row 2 Slip 1, p 7, p2tog, p 1, turn. Row 3 Slip 1, k 8, ssk, k 1, turn. Row 4 Slip 1, p 9, p2tog, p 1, turn. Row 5 Slip 1, k 10, ssk, k 1, turn. Row 6 Slip 1, p 11, p2tog, p 1, turn. Continue in this way, working 1 more st between dec until all 28 sts have been worked, ending with a wrong side row – 18 sts. Pick up sts for heel gussets as follows: Knit 9 sts; place marker (this is now the end of rnd marker); with another needle, knit 9 sts, pick up 19 sts along edge of heel flap, place marker, (with another needle, knit 14 sts of instep) twice; place marker, with another needle, pick up 19 sts along edge of heel flap, knit rem 9 sts – 84 sts. Gusset Rnd 1 Knit. Rnd 2 Knit to 3 sts before first marker, k2tog, k1, slip marker, knit to second marker, slip marker, k1, ssk, knit to end of rnd. Repeat Rnds 1 and 2 until 56 sts remain. Note Keep markers in place for toe shaping. Foot Work even in St st until foot measures 7½" (or 2" less than desired total length). Toe shaping Rnd 1 Knit to 3 sts before first marker, k2tog, k1, slip marker, k1, ssk, knit to 3 sts before second marker, k2tog, k1, slip marker, k1, ssk, knit to end of rnd. Rnd 2 Knit. Repeat Rnds 1 and 2 until 20 sts remain. Finishing Knit across first 5 sts of rnd. 10 sts will be for the top of foot and 10 sts will be for the bottom of the foot. Graft remaining stitches together. | |||||||||||||||
| |||||||||||||||
Saturday, November 18, 2006
Barbie's Shawl -- Versatile Grandma's Dishcloth Pattern

I love the Grandma's Dishcloth Pattern. You can use it so many ways. Sometimes I even make dishcloths!
When Jen, Becky, Kelly and Lala were learning to knit before I left Texas, Becky really wanted to make a lacy shawl. I knew she needed an easy pattern because she was still learning and she had not yet progressed to the Purl Stitch. So-- what did I do? I taught her Grandma's Dishcloth.
 As a demo of the pattern I made for one of Lala's Barbie's. This was quick to whip out and would let Becky see how the pattern worked. I knitted about 15 rows, then did a row of K1 YO K2Together until I was three from the end. That finished with a K1 YO K2T, K1. After that I did the "lace row" every ten rows. The shawl was knitted until it was as wide as wearers arms are when extended (about your own height). For Barbie around 12" was big enough. Extra long fringe finished it off.
Jen and Becky are big kids at heart. I gave them the Barbie model when I finished it, one night after Lala was asleep. They sat in Jen's room talking, and found themselves absently combing Barbie's hair and rearranging her dress and shawl while they talked. The girls may get bigger, but Barbie is still with them...
When Jen, Becky, Kelly and Lala were learning to knit before I left Texas, Becky really wanted to make a lacy shawl. I knew she needed an easy pattern because she was still learning and she had not yet progressed to the Purl Stitch. So-- what did I do? I taught her Grandma's Dishcloth.
 As a demo of the pattern I made for one of Lala's Barbie's. This was quick to whip out and would let Becky see how the pattern worked. I knitted about 15 rows, then did a row of K1 YO K2Together until I was three from the end. That finished with a K1 YO K2T, K1. After that I did the "lace row" every ten rows. The shawl was knitted until it was as wide as wearers arms are when extended (about your own height). For Barbie around 12" was big enough. Extra long fringe finished it off.
 Jen and Becky are big kids at heart. I gave them the Barbie model when I finished it, one night after Lala was asleep. They sat in Jen's room talking, and found themselves absently combing Barbie's hair and rearranging her dress and shawl while they talked. The girls may get bigger, but Barbie is still with them...
Life Changes
- The Experts list changing jobs and moving right up there with Death of a Close Family Member for high stressors that can affect your health. I do believe it.
We've been in the Kansas house three months now; I've been on my new job about six weeks. The furniture has pretty much found it's permanent locations but the boxes are still reproducing faster than I can unpack them. We really are going to have to have that It Didn't All Fit Sale. I have found the floor in most of the rooms.
The south bedroom was the big challenge. We stuffed all the "I'll think about it tomorrow... at Tara" stuff in there. I tackled that room last weekend and sorted the boxes. Unfortunately, those were my yarn boxes and sewing boxes and they were not going to be unpacked, just organized.
We put the sewing stuff in the attic (which is convieniently reached from a ladder in the south bedroom) and stashed the yarn tubs under the sewing tables. Aargh! I can't get my black chair in there! Joe, my son in college, gallantly offered to take the chair for his desk. (Why do I feel I lost on that one?) I still have to find room for Mom's cedar chest (full of fabric) that will also go in there. It's a small room. There may only be room to walk down the center.
Those Experts don't know stress. They missed Not Being Able to Use Your Sewing Room.
Monday, September 25, 2006
Thumb Cast On
I've been teaching the girls to knit. They have trouble remembering how to cast on because they only do it once per garment. I've been very frustrated trying to find a drawing of the thumb-cast on that Mom and I learned back in the 1960s. Maybe someday I'll find the book we learned from and be able to post the drawings for posterity. FOR JOY! One of the lists I read gave a link to a British site that illustrates the thumb cast-on. If my directions below don't work, go here http://www.coatscra fts.co.uk/ Crafts/Knitting/ Howtos/How+ to+Cast+On. htm
In the meantime, here is how I cast on.
Thumb Cast On
1. Estimate how long your tail needs to be. If my cast on is for 30 stitches, I wrap the yarn around one needle 30 times and make slip knot after last wrap. This gives more than enough yarn for the tail.
2. Hold the tail-end yarn with the last three fingers of your left hand.
3. Wrap clock-wise around your left thumb until you can see an X where the two pieces of yarn cross. (It won't work if you wind counter-clockwise).
4. Insert your needle under the left side of yarn.
5. Take the ball-side of the yarn and yarn over the needle. (Come from underneath and wrap across the top.)
6. Slip the loop on your left thumb over the needle, and snug down stitch by pulling on the tail-end.
Repeat until all stitches are cast on.
Provisional Cast-On
I have done a provisional cast on that is rather like this, wrapping around the thumb and slipping it over the needle without anchoring it with the ball-side yarn. It isn't as firm a cast on, but it will give you a starting point for adding stitches within a garment.
Tuesday, September 19, 2006
Drawstring Knit Bag
When I was working on the most recent incarnation of the Toad Rock Tie, I had a lot of trouble with my yarn. It was very slippery and kept falling off the ball and making knots in itself.
 My solution was to make the small drawstring bag above. I have since made two more. My second effort was made with size 6 needles/ size F crochet hook. It wasn't that much bigger in the base than the first, just taller. I didn't care for it. The third was made on size 8 knitting needles/size H crochet hook. The base is five rounds wide. It makes a very satisfactory bag for a standard sized skein of worsted. The key must be to increase the size of the hook/needle combination as you enlarge the bag. Oh, yes, for my largest bag, I switched from the bands of knit and purl to a k2, p2 ribbing. It worked well. I made my large bag from scrap yarn. It may take a bit more than one full ball of yarn if you are starting with a new ball.
These bags are quite handy because they keep your knitting together inside a larger bag. In a pinch you can drop your coins, or even an entire wallet in with your knitting and carry them as a purse.
Purse-sized Drawstring Knitting Pouch
1 ball Sugar n Cream cotton yarn (worsted weight)
1 size F crochet hook
Size 6 (4.00 mm) circular needles
Stitch marker
Pendant tread cutter (optional)
Crocheted base:
Chain 5 and join.
Foundation row: Chain 3. Join. 4 sc in circle.
Rd1: Chain 3. 2 sc in each of the 4 stitches.
Rd.2: Chain 3. *2 sc in first stitch, 1 sc in next stitch* repeat to end.
Rd.3: Chain 3,*2 sc. in first stitch. 2 sc. in each of next two stitches*. Repeat to end.
Stop here for small bag.
(Medium bag. Use a size 8 needle, and size H crochet hook) : Rd. 4: Chain 3, *2sc in first stitch, 3 sc. in next three stitches*. Repeat to end.)
(Large bag Size 8 needle, size H crochet hook) : Rd. 5: Chain 3, *2sc in first stitch, 4 sc. in next four stitches*. Repeat to end.)
Knitted sides: Remove crochet hook. Slip knitting needle into loop. Pick up one stitch around in each single crochet. You will be working from the inside out. What you knit will show as a purl on the finished bag.
Patterns:
Purl band: Knit five rows.
Knit band: Purl five rows.
Drawstring row: *YO, k2t* Repeat to end. If you do not come out even, include the last stitch in the k2t.
Small bag: Purl band, Knit band, Purl band, Drawstring row, Knit band, Purl band. Bind off.
Medium bag: Purl band, Knit band, Purl band, Knit band, Purl band, Drawstring row, Knit band, Purl band. Bind off.
Large bag: Purl band, Knit band, Purl band, Knit band, Purl band, Knit band, Purl band, Drawstring row, Knit band, Purl band. Bind off.
Crochet chain 28” (30”, 32”) long for drawstring. Knot end. If you want to attach a thread cutting pendant, slide it on after chain is finished. Slide it to the center of the string. Starting at center, weave both ends of string (one left, one right) into openings, Both can come out the same opening at the end, or have one opening each, as your spaces allow.
copyright Iris I. Jones 2006
Monday, September 18, 2006
Basketweave Afghan
 I have always thought of this as Jolene's afghan. She says she got the pattern from Kathy and I'm not sure to whom Kathy gives the credit. It's a wonderfully easy and adaptable pattern. Use 1 strand of baby yarn with size 6 or smaller needles and it's a great baby blanket. Use 1 or 2 strands of worsted weight with size 10 needles, it's a lap robe (bottom afghan). I used two strands together of Lion Brand Homespun on size 15 needles and made an afghan that nearly covers a twin bed. It took 6-8 skeins of yarn.
 Sorry about the cheap camera. It doesn't reproduce color well. The top afghan is the one made with 2 strands of Homespun knitted as one. It's actually a denim-blue called Williamsburg. The "red" one underneath is actually fuchia. It's made with 2 strands of knitted worsted on size 10 needles. The fringe is crocheted.
You can tell the top afghan is made with larger needles than the bottom one -- the squares are nearly twice as big.
PATTERN FOR AFGHAN:
Cast on 100 stitches using a circular needle with a long cable.
Row 1 *K10, P10* across.
Row 2: *P10, K10* across.
Rows 1-10: Repeat these two rows five times.
Row 11 *P10, K10* across.
Row 12 *K10, P10* across.
Rows 11-20: Repeat these two rows five times.
Repeat rows 1-20 until afghan is the size you want -- usually 100-150 rows. Another way to think of this pattern is that each square of Knit or Purl is 10 stitches wide and 10 rows high. The full afghan is 10 squares wide and either 10 or 15 squares high.
Fringe :
Row 1: SC in first knit stitch. *Chain 10; SC in 5th knit stitch.* to end.
Row 2: Chain 5. *SC in center of first chain. Chain 10.* continue around. Secure last stitch.
Add fringe in center of each chain section.
Family Stitch n Bitch --Learning to Knit
 Hm -- I wonder if the flak about that term has settled yet? Someone was tying to copyright the term and make anyone who used it back off. I haven't heard anything lately... Well, my girls love the phrase. We'll be Stitchin n Bitchin whether it's called that by name or not. That's Kelly on the far right, Becky holding the book and Jen hiding in back. Lala is perched on her Mom's lap.
 Three weeks ago it hit my daughter Jen that I really am moving to Kansas and Mom won't be just a holler away anymore. Suddenly it was "Mom! Teach me to knit before you go!" Gladly! So off we went to the yarn store for needles and yarn, not only for Jen, but also for granddaughter Lala (age 7). That evening we popped in one of my favorite videos (The Taming of the Shrew with Liz Taylor and Richard Burton) lined up on the couch and they learned to cast on and make the knit stitch.
When I explained the term "frog it" (for "rip-it, rip-it, rip-it" when you must tear out a mistake) Lala went into peals of laughter. She loves frogging. Last week she spent hours at the kitchen table, building popsycle stick buildings, then frogging them. It's a wonderful, all-purpose word -- sort of like the Scandahovian "Oof-tah!" we picked up when we lived in Minnesota. (Oof-tah can mean "Ah, go on with you!" "Oof, that's a long way down to pick up so small an object", or "Dang, I'm tired. Let me sit here a minute," or just about anything else.)
Jen and Lala have most of the traits of beginning knitters. They started off knitting too tightly. (They've worked out of that one by now.) Lala drops stitches. She will put the needle in, yarn over, then go to the next stitch instead of pulling the yarn through and slipping off the left needle. Jen adds stitches. The last stitch on her needle will roll, showing two threads where it should show one. She sees those two threads as two stitches and knits in them. Now that we've identified how the mistakes are made, we know to watch for them and fix them. Again, we have fun with it. If Jen should oops! and drop a stitch its "Oh, I did a Lala!" If Lala should add a stitch, it's "Oh! I did a Mommy!!" I was glad to learn the stitch making ditties that I've posted below. I'm hoping they will help Lala remember to finish her stitches.
The second weekend after they learned to knit was a Reyes weekend. (He lives with his Dad but visits his Mom every other weekend.) Becky, Jen's best friend, came over that weekend to learn to knit. Another trip to the yarn store! (Oh, such torture.) Back in the DVD player with Taming of the Shrew and now there are more folks learning to knit than will fit on the couch. Becky picked it up quickly. (The knitting, not the couch.
 ) Lala introduced her into the fine art of frogging. Lala really would have more knitting to show for her efforts if she didn't enjoy frogging so much...
Come Sunday a very dejected Reyes (age 9) looked at me. "Can't I knit, too?" "Of course you can!" Hobby Lobby isn't open on Sunday, so for Reyes we went to Michaels. He has his own Lion Brand Kids Needles. His are size 10, cause he's the oldest. Lala's are size 8. He picked yarn from my yarn stash and back to the couch for his first knitting session. Don't teach an ADD boy to knit with the TV going. He got about 8-10 rows done before he had to go back to Dad's house, but America's Favorite Home Videos took it's toll on our knitting session. I'm not sure how much he learned.
So now our knitting session is Jen, Becky, Lala and Reyes. The following weekend Jen's other best friend, Kelly, came to learn to knit. Becky came as well. It was my last day at the Library. The girls fixed supper and we had potluck, video-fest and Stitch n Bitch. Not a bad way to finish the day. It was the last viewing of Taming of the Shrew. (I had to take it back to the library; I'm going to miss having staff priviledges and getting to check 3 day videos out for 2 weeks.) Kelly pulled a few Lala's and as many Jen's but she caught on quickly.
The adult girls are making garter stitch scarves on size 15 needles with Homespun yarn. (Lala and Reyes have smaller needles are are using a cotton worsted.) Each approaches the learning process differently. Kelly, the newest knitter, is still uptight about it. She struggled with working too tightly and how to form the stitches. I had her working with regular worsted weight yarn, but I could see her frustration factor rising, so I rummaged in my stash to find her some Homespun. She frogged the first project and cast on with the Homespun. "Oh! I love this. It's working!!" Once she had a different yarn she was home free. Not only is Homespun soft, it has a curly nature. Those wavy threads doesn't want to be pulled down as tightly as worsted weight, so Kelly has a natural "brake" on the 'too tight" factor.
Jen has finished her first scarf. It has a wasp waist at the bottom and waves in and out as she learned how to count her stitches and keep from adding stitches. There are a few holes where she dropped stitches, but she doesn't want to tear it out. "It's my masterpiece! I made an entire scarf!" Much as Julie noticed when I taught her to knit last fall, the quality of the work improves in the last 1/3 of the scarf. Jen has started scarf #2 with some Lion Brand Jiffy Thick and Quick. It's working up beautifully. No wavy edges, no dropped stitches. Jen has mastered the garter stitch scarf.
Becky, on the other hand, doesn't want mistakes in her first scarf. She only has about three feet finished because she has frogged freely to repair dropped or added stitches. The yarn she is using has a subtle varigation to it. When she first noticed that one section was darker than the other, it worried her. Was she doing something wrong? Now she has knitted far enough for the repeat to show. She spends time admiring the cloth that is growing under her fingers and enjoying it's changes. Isn't this why we all knit? It's so much fun to watch something that was nothing -- a ball of yarn~ grow and become beautiful?
Lala just likes being included in what the grown-ups are doing. She get's frustrated easily and brings me her work to fix stitches. I may suggest she work on her weaving next time if the knitting isn't satisfying. It's more important that she have a good experience with handicrafts than that she finish anything properly. Now, I wonder if I've already packed all of the Knifty Knitters? She and Reyes were getting pretty good with those last winter.
Next Friday will be our last session before Pat returns. When he gets here, we fill the U-Haul and head North. Becky hsd been here during the week. She's been so good to help Jen and I move furniture or boxes or whatever it takes as I pack to leave this house and Jen moves into it. We're going to have Reyes next weekend and invite Kelly to come back. I hope to get a good photo of our group to post with this blog note. I want to teach at least one of them the purl stitch before I go. Jen isn't ready to learn it. She says she wants to be secure in the knit before she learns something new. (Not a bad idea). Perhaps Becky or Kelly will be ready. If not, I'll refer them to Julie, Jolene, Elisabeth, and the other knitters at the library when they are ready to learn. Jolene can always find the knitting video for them. Hm... I can send them the link for www.knittinghelp.com, too.
I'm so glad to see the girls knitting. They have a tradition to keep up now. Weekend videos and SnB.
Wednesday, September 13, 2006
Knitting Ditties and Tying a Bowline
- Have trouble remembering how to form knit and purl stitches? These ditties remind me of the story about the rabbit running around his tree* that we taught Brownies when they were learning knot tying. (I was so-o-o-o bad about tying the bowline that my rabbit couldn't even find the tree!)
By the way, these ditties work. I taught them to Lala on a Monday night. She was the first of our Stitch n Bitchers to learn the purl stitch! The next day she took her yarn to school and was teaching the kids in her second grade class knit and purl stitches during show-n-tell. That's pretty good for the girl that was forgetting to finish her knit stitches before she learn the poems. - To help you remember the knit stitch:
- In through the front door,
Run around the back,
Out through the window,
And off pops Jack!
This translates as: (Knitting American style) - In through the front door -- insert your right needle from front to back of the first loop on the left needle.
- Run around the back -- Loop your yarn from the bottom around the back of the fabric bringing it onto the needle. You will be looping the yarn from underneath, between the back of the fabric and the right needle, and laying the yarn over the needle.
- Out through the window -- draw the yarn that is laying across your right needle point through the loop that is on the left needle.
- And off pops Jack -- Tug gently to form a new loop on the right needle, and then slip the other loop off the left needle. The left loop will form the "knot" that secures the loop on the right needle. (If this doesn't work right, the stitch will not form and you will drop the stitch.)
and the purl stitch:- Under the fence
Catch the sheep
Back we come
Off we leap. - Under the fence -- Insert right needle from back to front into first loop on left needle.
- Catch the sheep -- with yarn pulled to the front of the fabric, slide it underneath the right needle and over so that it is laying in front of the loop on the left needle.
- Back we come -- using the point of the right needle, guide the yarn through the loop on the left needle to create a new loop on the right needle.
- Off we leap -- Slip left loop off of left needle, and allow it to tighten at the bottom of the loop on the right needle. Again, if this step doesn't finish and create the "knot" your stitch will drop and disappear.
- NOTE (6/30/09): Oral traditions are always evolving. My grandkids have already modified these to be:
In the door,
Run around the back,
Out the window,
Off jumps Jack. - and
- Under the fence,
- Catch a sheep,
- Out the window,
- Off we leap.
*For the curious, I searched the Net and found this tutorial on tying a bowline from Boy Scout Troop 184 in Tranquility, New Jersey. (Unfortunately, the site had been removed, so the link no longer works. :( iij 5/09)
The Bowline
It is time to put your first accomplishment to use. We will dip into Nature Studies to come up with the mnemonic or memory aid for tying the Bowline. Form an Overhand Loop about two feet from the running end of your rope. The part of the rope in your left hand is a tree. The standing end is the trunk of the tree. The Overhand Loop is a rabbit hole at the base of the tree. The running end is the rabbit.
The story goes: the rabbit comes out of the hole (through the Overhand Loop towards you), runs to the back (to the right) around the tree and goes back into the hole from which he came. Now grab hold of the running end and the part of the loop which is closest to the running end in one hand and the standing end (the tree trunk) in the other hand and tighten the knot.
The question of which way does the rabbit go is frequently asked. Consider the loop which forms the letter “P” to be the direction pointer and go straight back on that side. The result will be that the running end will be inside the noose. If the running end winds up on the outside of the noose, the knot is not a true Bowline (called a Left-Handed Bowline, no offense, Lefties) and it will be a much weaker knot.
I have lost the illustrations that originally came with these directions, but I did find this website that gives step-by-step photos. http://www.wikihow.com/Tie-a-Bowline-Knot
Saturday, September 9, 2006
Balloon Ball Winder
 Do you have a few skeins of yarn that needs rewinding, but it doesn’t justify the cost of a mechanical ball winder? Here is a simple manual version. You will need:
* A package of small balloons. The ones I used were marketed as water balloons.
* Your yarn.
* A pair of scissors.
* A bit of time and patience.
1. Blow up the balloon so it is about the size of a small egg.
 2. Tie the end.
3. Loop the end of your yarn around the end of the balloon. (It is not necessary to tie it.)
4. Wind the yarn around the balloon.
5. Vary your direction frequently, but do not cover the end of the balloon.
 6. Wind all of the yarn onto the balloon, being careful to cover any places where the balloon shows through.
7. When you finish, the ball should appear solid, but the top of the balloon will still peak out.
8. Tuck the tail end of the yarn around the last section of windings so it will not come loose.
 9. Pull up on the knot of the balloon and snip a small hole to let the air out.
10. Occasionally the balloon will pop, but it usually collapses slowly.
11. Remove the balloon and pull out the center thread.
12. Squeeze the yarn to reshape the ball.
13. Viola! Your own hand made center pull ball!
Saturday, September 2, 2006
Second Shrug
 I'm working on Ashley's shrug now. She's 5'6" and likes extra long sleeves. I'm making her shrug with the needles the pattern called for and am making each section 24-25" long (roughly 4 stripes plus the cuff). Her's is a tone-on-tone pink shrug, using two dyelots of the same Lion Brand Lt. Pink 101. One dyelot is considerable paler than the other so I'm making a striped shrug -- 3" cuffs (lt. pink), 5" stripe (darker pink), 2nd 5" stripe (lt. pink) etc.
Jenessa's Drop Stitch Shrug by Hazel Spencer
 I am making shrugs for the 5 granddaughters for Christmas. I made the test version for Lala to see how the pattern worked. Lala picked the colors. Didn't she do a nice job? Pink cuffs and flecked main body. I think it's prettier than the picture that came with the instructions. (I'm not a doting grandma!! )
This is a nice pattern, easy to follow and very adaptable. I made Lala's smaller by using size 7 dpns and size 9 straight needles. To get the 3/4 length sleeves, I made each section (sleeve, back, 2nd sleeve) 14" long.
Here is the pattern as I found it on the website http://www.knitlist.com/99gift/shrug.htm
or http://www.hazelroselooms.com/project_files/Jenessa.pdf
A hot fashion accessory that used to be Gramma's bed jacket, but we won't tell them! I whipped this one out in a couple of evenings for my teen niece. It would probably be most acceptable in black or something sparkly! It's easy and fast and fits most teen girls through young adults. But it's adaptable by your gauge.
I used worsted weight yarn and size 8 dps and 10 straight needles. This pattern makes sleeves to just below the elbow, but you can make them any length. Measure your teen!
A little aside: If you are making this as a surprise gift and need to know, ask her her height. This is the same measurement as she is from fingertip to fingertip with her hands out at each side. Subtract 12 inches (length of two hands) and you have the length a wrist length shrug needs to be.
On the dps cast on 32 stitches evenly, place marker to mark first stitch.
Cuff: k2 p2 ribbing for 2 inches. (I stopped the ribbing and did two knit rows for the increase rows.)
Next row: increase evenly 8 stitches.
Next row: increase evenly 8 stitches.
Begin drop stitch thus:
Row 1: *yo k1* around.
Row 2: * drop yo, k1* around. Repeat these two rows ending with row 2 until piece measures 12 inches from CO (or measurement needed for your sleeve length) continue working drop stitch thus:
Row 1: *yo, k1* to marker, turn.
Row 2: *drop yo, p1*
Repeat these two rows for 20 inches. (Change to straight needles as soon as your work flattens enough. You don't have to change needles but it's less awkward) At end of 20 inches knit back onto dps and join in a tube again knitting sleeve length to match first. (Remember that you won't be purling anymore!)
1st decrease: knit 2 together 8 times evenly
2nd decrease: knit 2 together 8 times evenly
Cuff: k2 p2 for 2 inches,
Bind Off.
Tuck in ends.
You're done.
This pattern is Copyright © Hazel Spencer 1999 all rights reserved. E-mail Dorleska@tds.net
Tuesday, June 20, 2006
I found out what I was doing wrong!!!!
I had the wrong yarn.
I finished the "Toad Suck Tie" better known now as the "T0ad Suck Belt." It has a uniform dimension of 3" across from square end to pointy end. Hm... This just isn't right. Pat did try it on and tied it. He said the cotton yarn wasn't working. It wasn't slippery enough for the knot to slide into position against his neck.
So we went looking for slippery yarn at Yarn Heaven, in Arlington, Texas. I thought silk, but the women at the store found us a beautiful, stretchy shiny SOCK yarn called Opal. Pat chose Barney purple. He knows it will compete wonderfully with Spongebob Squarepants.
I always thought sock yarn was the same as fingering yarn. No way. This yarn is tiny, tiny. And lo, and behold. When I went back to the Toad Rock Tie pattern, what does she ask for? Opal Sock Yarn.
14 stitches in fingering yarn on size 1 needles came out about 3" wide.
13 stitches in Opal sock yarn on size 1 needles is about 1" wide. Hm... there's a clue here.
I'm back to the Toad Rock Tie pattern. Bet it works now.
Monday, June 19, 2006
Toad Suck Tie -- make that Belt

The tie did not get made for Father's Day. It has had about 3 different incarnations. After Pat and I got to talking about how thick the Toad Rock Tie would be when finished and tied into a knot, I gave up on that pattern and frogged back to the beginning -- on the Friday before Father's Day.
The Toad Rock Tie is still my inspiration, but it is knitted in the round, giving the entire tie a double thickness of fabric. I'm knitting with sport-weight yarn. That means the bottom of the tie is two thicknesses of sport-weight and so is the top. Who knows how many layers of fabric will be wound around in the knot. I'm afraid Pat would never be able to lower his head because of the size of the knot.
SO... as I said, the Toad Rock Tie is my inspiration, but I'm designing the Toad Suck Tie, named for one of Pat's favorite places, Toad Suck, Arkansas. This tie is a single thickness of garter stitch 14 stitches wide. After I reach 90 cm. I'll go back to the Toad Rock pattern and see how Celeste created the swell for the pointed end of the tie. I'll borrow from her and adjust a bit here, change a a bit there, and finish the Toad Suck Tie. Hopefully, by July 4.
Thursday, June 8, 2006
Toad Rock Tie

Where Pat works, supervisors must wear a tie. He and another man are vying for most outrageous ties. Fabian may be ahead on points. He wears Spongebob Squarepants, Homer Simpson and other cartoon characters, but Pat will have the ONLY hand knit tie.
Celeste from Knitting Beyond the Hebrides was kind enough to share her pattern with me. http://www.knittingbeyondthehebrides.org/color.html I'm making it of Omega's Sinfonia yarn (100% cotton, made in Mexico). It is a varigated blue in color. The yarn is sport weight and resembles thick embroidery thread. I have a bit of trouble with the yarn splitting as I knit with size 1 needles. If the needles were larger, it probably wouldn't have the problem. Two weeks to go -- wow! Did you know neckties are about five feet long???? That's a lot of little tiny stitches!
Saturday, May 6, 2006
I Love KansasKnits!

I was trying to find a chat group that links Kansas knitters, but nothing exists. The only all state group never got off the ground. So, why not? I've started a knitting group. Here's hoping someone joins!! 
Monday, April 10, 2006
Oregon Vest

I'm starting the Oregon Vest from Oat Couture for Pat. He chose a tan Lion Brand Homespun yarn for it. The picture above is from Oat Couture's catalog.
Since I knit like I read books (book for the bathroom, book for the bedside, book for the purse, and then there's the one I'm REALLY reading...) , I have other projects in progress as well. I finished the double knit hat I was making Joe. That one was fun!
I'm finally making a scarf for myself of The Cat's Meow Paradiso. It looks like fleece cut thin and given a serged edge. The yarn is shades of violet to purple and I'll wear it with the fleece hooded cape I made.
There is always a dishcloth lurking in the background. It's my favorite no-brain knitting project.
And then there are those Barbie clothes... I may never get all those little pieces completed and sewn together. Size 2 needles are so slow... (Couldn't be the knitter's motivation, could it?)
Sunday, April 9, 2006
More About Knitting Sweaters with Cotton Yarn
 I keep learning more on this subject. Cotton and flax are vegetable fibers. They don't have the spring that animal fibers have. If you don't knit tightly, there is a chance these yarns will drag down with the weight of the sweater and pull out of shape. Washing restores the shape, but there you are -- with a sagging sweater while you are wearing it. (Remember white cotton socks that always ran down at the heel because there was no elastic in the cuffs? That's the idea.)
Here's what Claire Crompton says about cotton in The Knitter's Bible (David & Charles, c2006): "Cotton is a heavy yarn, so the weight of a finished garment can cause it to drop and the garment to get longer. It also lacks elasticity and so ribs become baggy, though this is restored after washing. Cotton blended with a synthetic fibre will have more stability. However cotton is a great yarn to use for crisp stitch textures and looks beautiful in lace knitting. Mercerized cotton has been treated to add lustre and take brighter dyes; it is stronger than untreated cotton and harder wearing."
There are some ways to get around this problem.
1. Choose light, open patterns that won't add to the weight of the sweater. (My Aran sweater is probably a poor pattern choice.)
2. You can knit cuffs with much smaller needles than suggested by the pattern. If the pattern says 8, use 6, for example.
3. You can also knit a thread of elastic into cuffs and wastebands. There are some small ones that can be in-obtrusive.
4. The best answer is to look for a yarn that is blended with a fiber that does have spring in it. 80% cotton, 20% wool; Cotton--synthetic; Cotton-silk.
As I plan this sweater for my friend, I thought I'd found the perfect yarn for Texas -- cotton/flax. Now that I've ordered it, I realize flax is going to have the same trouble as cotton. It's a plant product. I may be looking for that in-obtrusive elastic yet. Of course, the yarn is on back-order until the middle of May. I may never get it. The issue may resolve itself.
Wednesday, March 8, 2006
Projects For When You Are Out of Knitting Projects
Sweetie Luvv on Knitlist wrote asking for suggestions for something to knit now that she was caught up. I sent her this answer :
I have it in the back of my mind that I'd like to make slippers or dishcloths or some other small, practical item and stash them for gift giving (if I ever get to the point where I'm caught up on projects).
We had a woman who worked with us years ago who crocheted slippers. When Christmas came she loaded the table in the breakroom with slippers of all colors and types. We had such fun chosing our own special pairs! That lady is now dead, but I still have my last pair of "Mary slippers" and I cherish them.
I received this note in response to my post:
Baby car seat blankets. You would think, being nearly 44, that I'd be running out of friends having babies, but I swear, I've had to knit about 5 of these things this year and got to the point (they're quick and easy) that I started making extras. You never know when you'll need a shower gift!! Dishcloths are another project I like to do when I don't have a project.
Karel Lea, TN
The link I used to have posted here no longer works.  Try using your favorite search engine for "knitted baby car seat blanket pattern" or some variation of these words to see if you can find another. --iij
Hm... regular baby blankets, especially simple ones like basketweave or the dishcloth pattern, would be just as useful to have in a gift stash as the car seat blankets. Scarves and neckwarmers would be other 'quickie" gift projects. I like getting suggestions! I'm noticing that a lot of these "non-projects" are portable and use up the yarn stash. More plusses for this project!
I'll post to this blog any other suggestions I get. Readers, please send your favorites to me at tilla2@yahoo.com.
Some ideas that I have seen mentioned on knitlist include:
1. Knitting for charity. The list seems endless : mittens, chemo caps, baby blankets, children's vests... Contact the charity of your choice and see what they need. Here's one mentioned on knitlist :
You could join us on the Mittens_For_Akkol Yahoo Groups list and knit for
the kids in the orphanage in Akkol, Kazakhstan where temps this winter dipped to
40 below zero and the kids have inadequate clothing. There is more info
here: _http://www.knit-on.com Choose the "Help Others" option to get to the page.
the kids in the orphanage in Akkol, Kazakhstan where temps this winter dipped to
40 below zero and the kids have inadequate clothing. There is more info
here: _http://www.knit-on.com Choose the "Help Others" option to get to the page.
Charity items can also include:
Blanket pieces (Warm Up! America)
Hats (shelters, Afghans 4 Afghans, Caps for Kids)
Mittens (shelters, local schools and tutoring programs)
Slippers (Toasty Toes)
Baby items (local charity hospital maternity ward)
Chemo caps
Scarves (Christmas at Sea - also hats and mittens)
Over on KnitTalk we have a folder with info about charity groups and activities to which members can contribute. --- Margo Lynn
2. Bedding for animal shelters.
3. Socks.
4. Hats
5. Knit squares (in all different stitches of course), for a future “sampler” afghan. This one uses up those bits of yarn, and is nice and portable. -- Lois
6. Cat toys. =^..^= They only take an hour or two (mostly) and they use up odd scraps of yarn. ---Eileen
http://i38.photobucket.com/albums/e111/lindydiva/CatToys_1.jpg
http://i38.photobucket.com/albums/e111/lindydiva/CatToys_1.jpg
7. Make a dog sweater. Here's a great pattern. http://www.redlipstick.net/knit/chihswe.html
8. Garter stitch coin purse, from Mari.
Cast on enough stitches to make a piece about 3" wide, then knit for about 6 inches and make a yarn over buttonhole and knit a few more rows then cast off. Fold so that the buttonhole overlaps and sew up the sides to make a pouch. It could also be made longer for a cell phone cozy or an eyeglass case. A few people I taught to knit have done this. They would learn to cast on, knit, yarn over, cast off and sew a simple seam.
9. Baby blankets or sweaters are good, because you never know when you will need something in a hurry! -- Margo Lynn
Sunday, February 26, 2006
Tessellating Fish Knitting Pattern
I read Knitlist daily. There has been a lot of discussion about the tessellating fish afghan pattern no longer being available. I surfed the web and found the pattern at http://yarngrrrl.livejournal.com/ and the pictures at http://brieza.livejournal.com/19896.html Figuring that it's a good thing to have the pattern posted in several places, I'm going to post it here as well. Thank yous to Yarngrrrl and Brieza for keeping the pattern alive.
Tessellating Fish Knitting Pattern

1. Cast on 6
2. K6
From this point forward – slip the first stitch purlwise. Trust me, you'll
appreciate this when its time to seam!
3. Slip, Kfb, K2, Kfb, K1
4. Slip, K7
5. Slip, Kfb, K4, Kfb, K1
6. Slip, K9
7. Slip, Kfb, K6, Kfb, K1
8. Slip, K11
9. Slip, Kfb, K8, Kfb, K1
10. Slip, K13
11. Slip, Kfb, K10, Kfb, K1
12 Slip, K15
13. Slip, Kfb, K12, Kfb, K1
14. Slip, K17
15. Slip, Kfb, K14, Kfb, K1
16. Slip, K19
17. Slip, K19
18. Slip, K4, P10, K5
Here is the change!
19. Slip, SSK, K1, Kfb, SSK, K6, K2tog, Kfb, K1, K2tog, K1
20.Slip, K4, P8, K5
21. Slip, SSK, K1, Kfb, SSK, K4, K2tog, Kfb, K1, K2tog, K1
22. Slip, K4, P6, K5
23. Slip, SSK, K1, Kfb, SSK, K2, K2tog, Kfb, K1, K2tog, K1
24. Slip, K4, P4, K5
25. Slip, SSK, K1, Kfb, SSK, K2tog, Kfb, K1, K2tog, K1
26. Slip, K4, P2, K5
27. Slip, SSK,
K1, Kfb, SSK, Kfb, K1, K2tog, K1
28. Slip, K10
29. Slip, SSK, K1, Kfb, K2tog, Kfb, K2tog, K1
30. Slip, K9
This is the end of the change.
31. Slip, K3, K2tog, K4
32. Slip, K8
33. Slip, K8
34. Slip, K8
35. Slip, Kfb, K5, Kfb, K1
36. Slip, K10
37. Slip, Kfb, K7, Kfb, K1
38. Slip, K12
39. Slip, Kfb, K9, Kfb, K1
40. Slip, K14
41. Slip, Kfb, K11, Kfb, K1
42. Slip, K16
43. Slip, Kfb, K13, Kfb, K1
44. Slip, K18
45. Slip, Kfb, K15, Kfb, K1
46. Slip, K20
47. Slip, Kfb, K17, Kfb, K1
48. K23
Bind Off
Wednesday, February 22, 2006
Grandma's Dishcloth Pattern
 This is the pattern for the dishcloths that I've been knitting. The sample in the picture was made with three kinds of cotton worsted: Lily, Bernat and Bear Brand.
Grandma's Dishcloth
An easy to do pattern and that gives a classic look, Grandma's Dishcloth is a garter stitch square with a openwork edge created with a yarn-over placed at the beginning of each row.
 Remember when you make the dishcloth that 100% cotton yarn will shrink when washed (10-15%), so make it a bit bigger than you want the finished piece. I figured I wanted a 12 inch cloth so I'm making it 13.5 inches before washing. Thirteen and one half inches will give a maximum width of 60 stitches using worsted weight yarn on 3.75 mm needles. (I have found these to remain HUGE, so I now do a 40-50 stitch dishcloth. 25 stitches makes a drink coaster. Make it larger and stop at the last increase and you have a shawl! I have also found my favorite yarn for dishcloths is Sinfonia from Hobby Lobby. It is a sport weight instead of a worsted weight cotton yarn. The cloths made with Sinfonia are tighter and more delicate.)
The pattern:
Cast on 3 st.
Increase Row: K1, YO [yarn over], knit to end
Repeat increase row until cloth is desired width (I use 40-50 for dishcloth).
Decrease Row: K1, YO, K2 tog [knit 2 together], knit to the last 3 sts, K2 tog, K1.
Repeat decrease row until row is 3 sts.
Bind off loosely.
I've seen variations of this that knit three or four stitches before the YO, then do the YO three or four stitches before the end. I have also seen variations that did rows of alternating YOs every 1 1/2-2 inches in the cloth. I tried both of these variations. The wider border was easy. Decreasing and doing the YO rows took more concentration. If you aren't careful you have added instead of decreased at the end of the row. Knowing how many stitches I should have at the end and counting each row kept me on target.
YO (Yarn Over) = wrap yarn around the needle from front to back and proceed to next stitch. This equals one increase. This will leave a opening in the next row. In this case it creates the eyelet edging for the dishcloth.
 Barbie's shawl, made with Sinfonia, is a dishcloth that stopped at the largest dimension just before the decreases began. Fringe was added in each of the eyelets.
 I recently (2017) made a full-sized shawl using the same technique as the Barbie shawl. I added the continuous row of eyelets about every 25 rows. The eyelet row was made this way: K1, *YO, K2together*. Repeat between the *s until the end. Finish with K1. The YO adds a stitch and the K2together removes the extra stitch so you end up with the right count at the end.I will post a photo of the finished shawl soon.
Monday, February 20, 2006
Results of Cotton Yarn Investigations

All of the knitting samples have been finished.
I washed the three test subjects. The Lily yarn shrank the most -- which wasn't a whole lot, perhaps 1/2 in. on each side. The Lion Brand showed the least shrinkage. Bernat was the softest before and after washing.
Knitlist has had some discussion about Bernat Cottontots pilling badly, particularly with the colored yarns. My sample is off white. There isn't any serious pilling with it, but I would be careful to test colored yarn before making a large project with it.
Lion Brand impressed me because it was pretty "string-like" before washing, but washed up a bit softer than the Lily. It also lightened in color after washing. I'm going to show my testers to Steve and see which yarn he wants for his sweater. I'm leaning toward the Lion Brand because it's color is nice, it's has a good texture and is reasonably priced. The Bernat it definitely the softest, but I'm concerned about the possibility of pilling in the future.
I will be attaching photos of my test pieces and controls, plus close ups of the various yarns, as soon as I can get my husband to break out his good camera.
NEXT BIG PROJECT will be designing an Aran vest for my husband, Pat. I have the yarn for this in my stash, but have never developed my own pattern before. When I have mastered the vest, I'll be ready to take on Steve's full Aran sweater.
PRESENTLY ON THE NEEDLES: Double-knit hat for son, Joe. I knitted a watch cap for Joe for Christmas. He likes it but says it's not warm enough when the wind chill is around 10 degrees. I found the pattern for a double-knit ski cap through Knitting Pattern Central. Here's the link. http://alison.knitsmiths.us/pattern_double_knit_cap.html
I'm enjoying making the double-knit hat. I was afraid the 162 stitches cast on would make the hat too large. Trying on the first pass of 162 stitches saw my knitting falling down past my ears and landing like a collar around my neck. I subtracted 8 stitches (about 1 inch) and find this a better fit. The hat fits loosely around my head without expanding the stitches at all. Since I wear a small hat and Joe wears a large one, this should work for him. I hope to have the hat finished and in the mail to him by Wednesday.
Friday, February 10, 2006
Cotton Yarn Investigations
 I have finished 4 of 6 sample dishclothes -- 2 Lily Sugar 'n' Cream and 2 Bernat Cottontots. I've the first of the 2 Lion brand cloths in progress.
 Keeping back the "control" versions of Lily and Bernat, I tossed the other two in the washer with a towel load -- warm/cold water, regular wash, Downy fabric softener, heavy duty dry. There wasn't a lot of shrinkage, less than 1/2 inch all around. The Lily yarn had felt scratchy and stiff, more like butcher's string, when I was knitting with it. It softened and fluffed considerable during wa shing. The Bernat softened a bit, but had a nice "hand" eve
 n in the skein. The Lion feels very string-like. The thread is dense and looks quite a lot like butcher's string. It will be interesting to see how it washes.
Further research on these three yarns : Lily comes in three sizes : Regular ball 120 yds; Superball 200 yd.; Cone 805 yds. Bernat only comes in a 200 yd. ball. Lion Brand "Lion Cotton" comes in a 236 yd. ball and a 775 yd. ball. If there is no significant difference in the yarns after they are washed, the Lily cone is the most yarn  for your money. The
  Bernat Cottontots is the most expensive of the three yarns. It can range up to $6.00 a skein. That's pretty expensive when you need over 2000 yds. of yarn for a sweater.
Subscribe to:
Posts (Atom)

